• Skip to primary navigation
  • Skip to main content
  • Skip to primary sidebar
  • About
  • Contact
Check out my new cookbook

The Toasted Pine Nut

fun. flavorful. feel-good recipes.

  • Check out my cookbook!
  • Recipes
    • Dessert
      • Cookies
      • Bars & Brownies
      • Breads & Muffins
      • Cakes & Cupcakes
      • Pies & Crumbles
      • Candy
      • No Bake
    • Meal
      • Breakfast
      • Main Dishes
      • Appetizers
      • Sides
      • Snacks
      • Drinks
      • Salads
      • Sauces & Dips
      • Dessert
    • Diet
      • Gluten Free
      • Dairy Free
      • Vegan
      • Vegetarian
      • Egg Free
      • Kid Friendly
      • Low Carb
      • Nut Free
    • Meat
      • Fish & Seafood
      • Chicken & Poultry
      • Beef & Pork
      • Meatless
    • Method
      • Air Fryer
      • Slow Cooker
      • Instant Pot
      • Oven
      • Grill
      • Stovetop
    • Season
      • Spring
      • Summer
      • Fall
      • Winter
    • Recipe Filter
  • Shop
    • My Baking Mixes
    • Kitchen Essentials
    • Pantry Items
    • Kid Favorites
    • Photography
  • Cookbook
  • Videos
Home Recipes Breakfast
Leave a Review

20-Min Crustless Muffin Tin Quiche

20 min
GF Gluten-Free NF Nut-Free
by: Lindsay Grimes
May 23, 2023 (Updated: September 27, 2024)
Jump to Recipe
Leave a Comment

This post may contain affiliate links. Please read our disclosure policy.

This is an overhead vertical image of a silver cooling rack with muffin sized quiches on it. The quiches are topped with melted cheese, chunks of ham, and chopped parsley. The cooling rack sits on a yellow surface.
Muffin tin quiches are packed with flavorful fillings and perfect for on-the-go meals or meal prep. They’re simple to make and customizable!

Muffin tin quiche made in a muffin tin are quick and easy breakfasts that are so simple to make and are a perfect option for busy mornings or last-minute gatherings.

They are packed with a creamy egg and cream mixture, and can be filled with your favorite ingredients such as ham, cheese, and vegetables.

Muffin tin mini quiches that are great for breakfast, brunch, or as a yummy snack throughout the day. Enjoy the convenience and scrumptiousness of these crustless muffin tin quiches in a flash!

If you love eggy recipes you have to try these Cheesy Hash Brown Muffin Tin Egg Bites, Cheesy Pepper Sausage Keto Breakfast Casserole, and Instant Pot Egg Bites.

Why You’ll Love these Muffin Tin Quiches

So customizable! Crustless muffin tin quiches are incredibly versatile, allowing you to customize the ingredients to suit your preferences. You can mix and match various fillings such as different types of cheese, vegetables, meats, or herbs, creating endless flavor combinations.

Grab & Go! The individual size of crustless muffin tin quiches makes them perfect for on-the-go eating or meal prepping. They are easy to pack for lunches, picnics, or as a snack. The muffin tin shape allows for neat and compact servings, making it convenient option.

Healthier option! By going crustless, these muffin tin quiches are lower in overall calorie and carbohydrate content. Plus, you can control the ingredients used, opting for healthier options like lean meats and vegetables.

Ingredients for Muffin Tin Quiche

Eggs. Eggs serve as the primary binding agent in quiches. They provide structure to the dish and give it a smooth, custard-like texture.

Heavy cream. Heavy cream is a rich and creamy and enhances the luxurious texture of the quiches. It contributes to the overall richness and smoothness of the custard, making it more indulgent and satisfying.

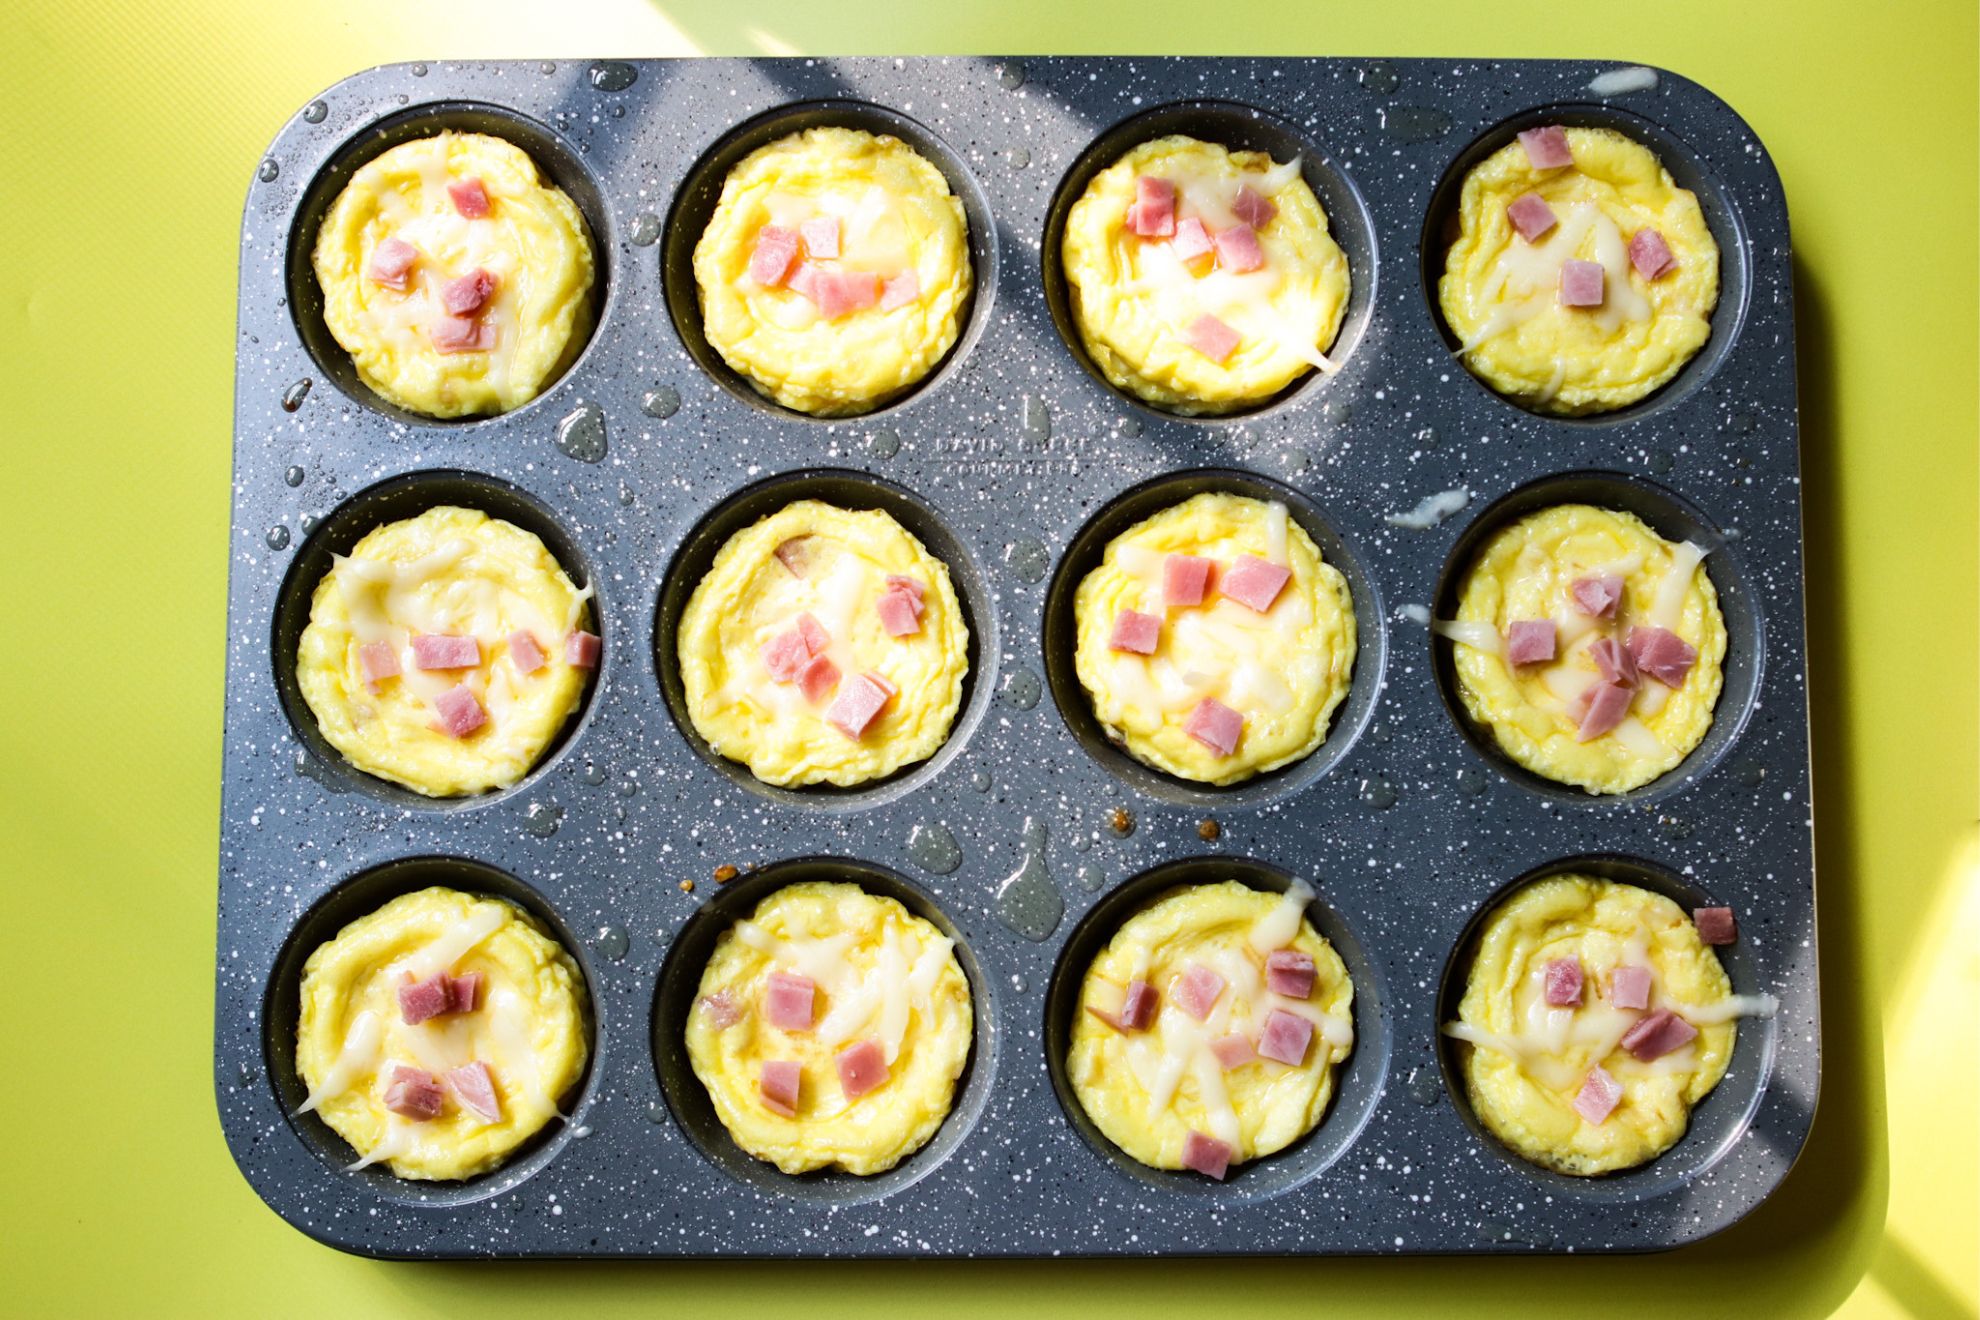
Shredded cheese. My favorite to pair with ham is Gruyere cheese so I went with that! When shredded and added to the quiche mixture, cheese will melt beautifully and for added flavor with every bite.

Ham. Ham adds a savory and slightly salty flavor to the quiches. It complements the richness of the eggs, cream, and cheese. The saltiness of the ham helps balance the flavors and adds an additional layer of complexity.

This is an overhead horizontal image of a large scalloped milk glass bowl on a yellow surface. In the bowl are six eggs and heavy cream.
Mix together the ingredients.
This is an overhead horizontal image of a 12 cup muffin tin. The grey speckled muffin tin has oil sprayed on it and each muffin cup is filled with a raw creamy egg mixture with chunks of ham and shredded cheese.
Fill the muffin tins and top with your goodies!
This is an overhead horizontal image of a 12 cup muffin tin. The grey speckled muffin tin has oil sprayed on it and each muffin cup is filled with baked egg quiches topped with chunks of ham and cheese. The muffin tin sits on a yellow surface.
Bake for 15 minutes.
This is an overhead horizontal image of a silver cooling rack with muffin sized quiches on it. The quiches are topped with melted cheese, chunks of ham, and chopped parsley. The cooling rack sits on a yellow surface.
Enjoy immediately or save for later!

How to Make Muffin Tin Quiche

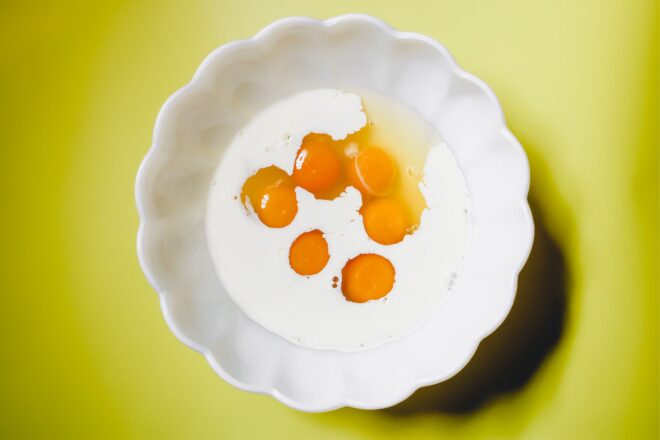
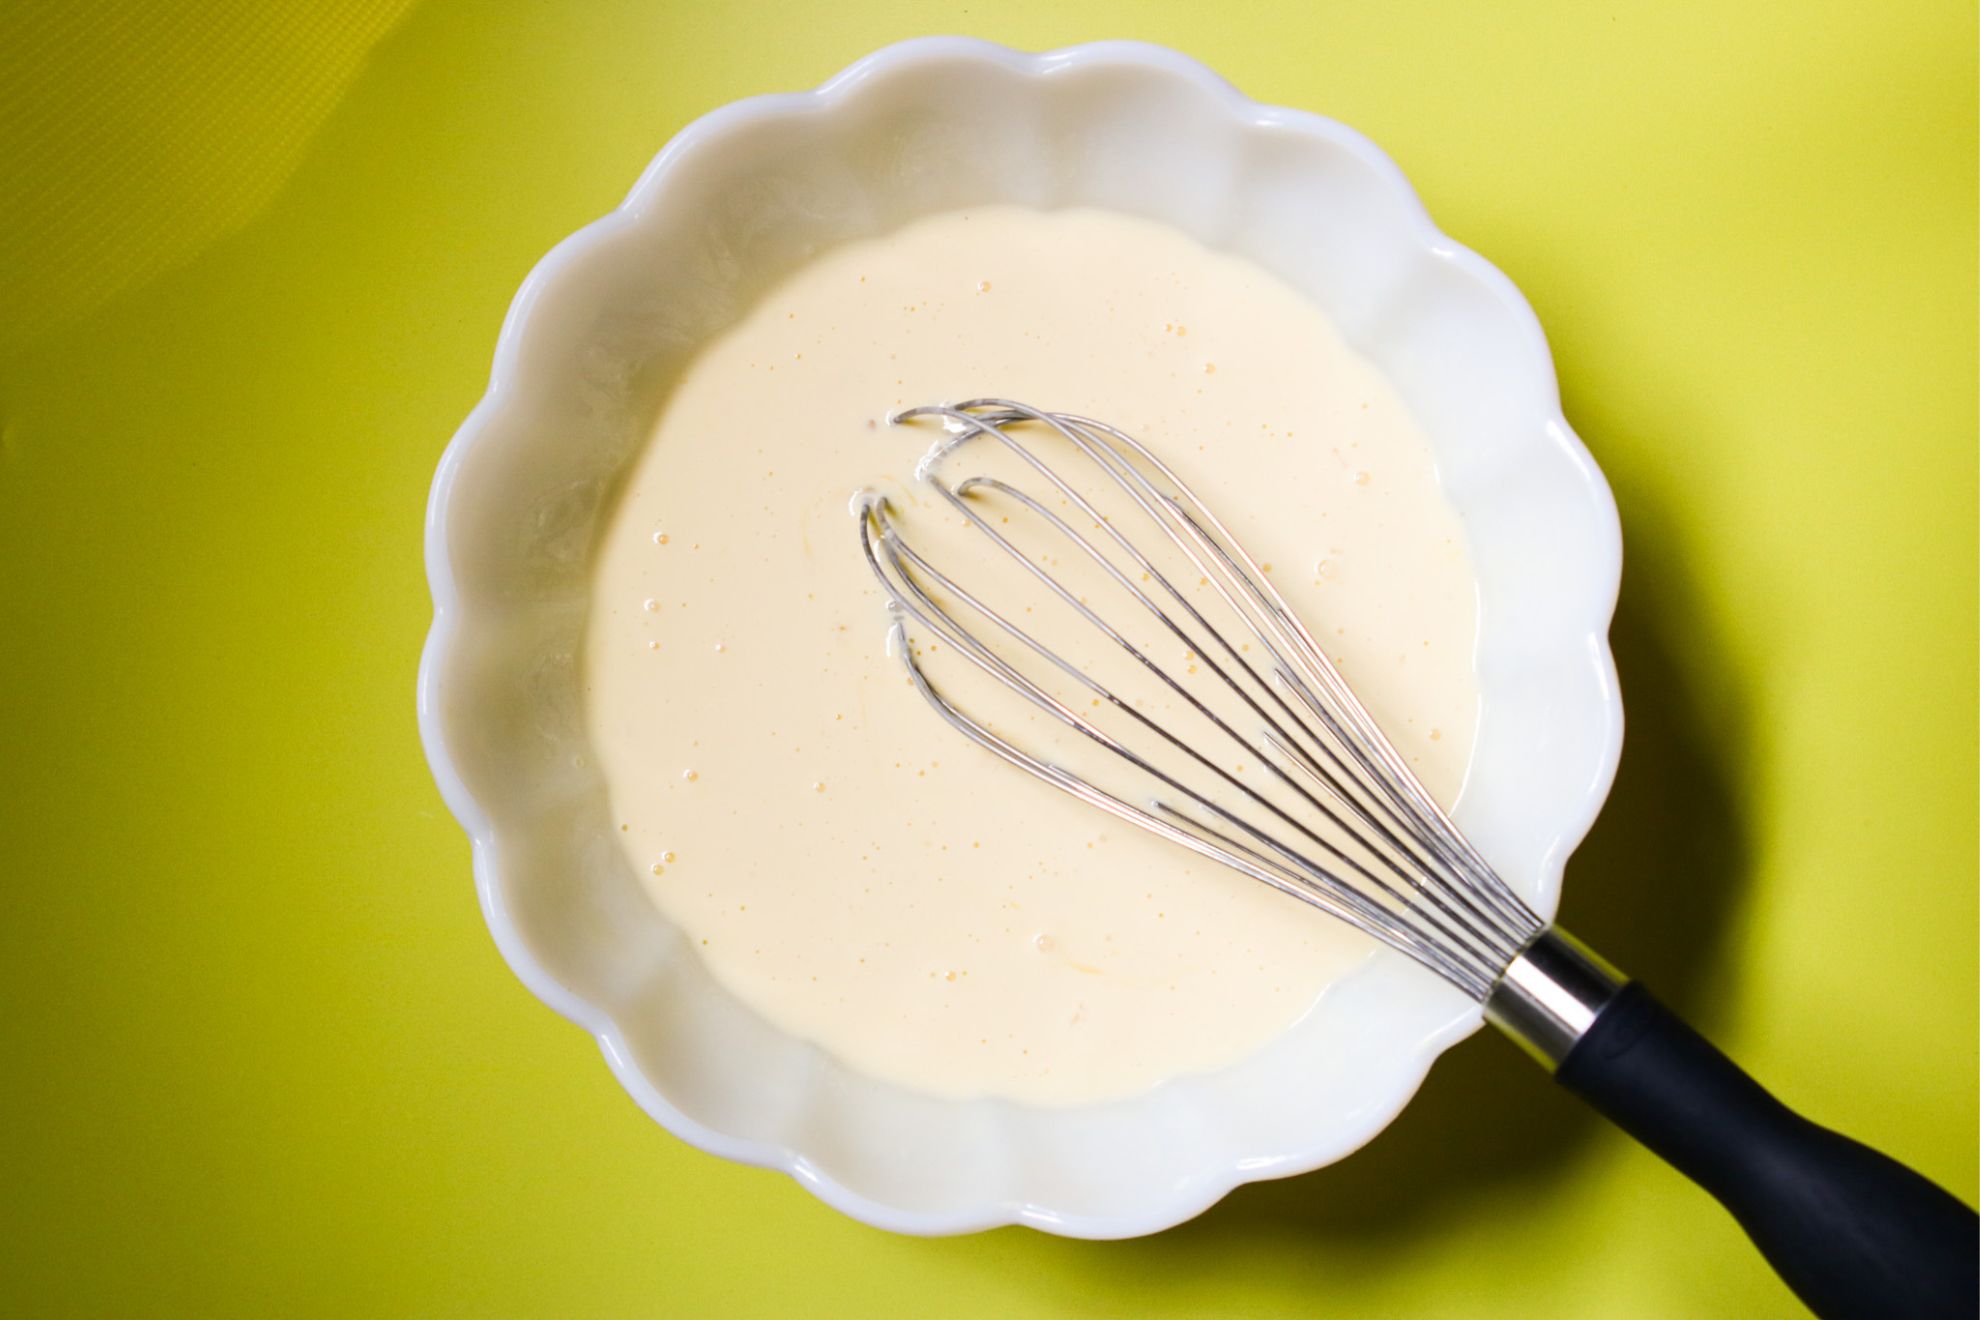
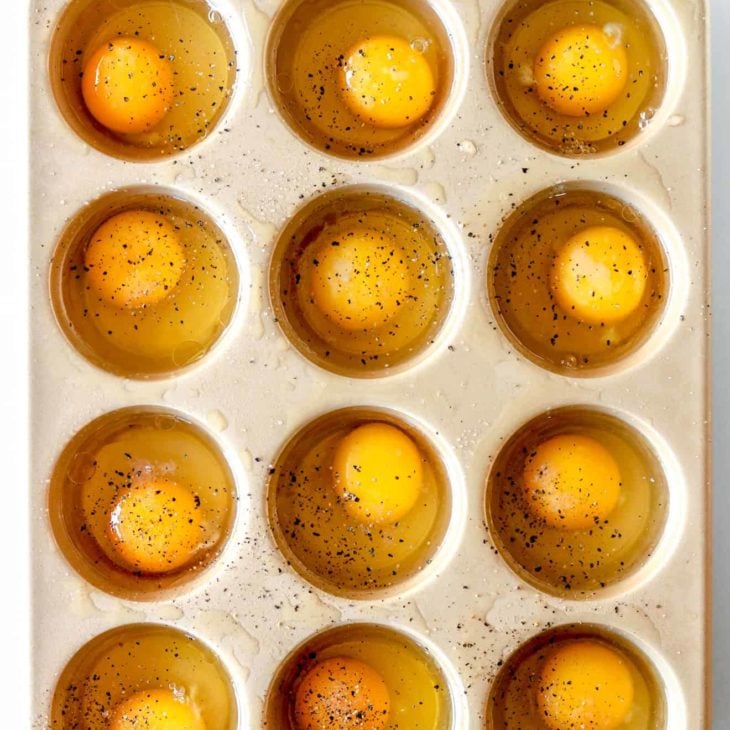
  1. Measure. Measure the eggs and heavy cream and place them in a medium-sized bowl.
  2. Mix. Use a whisk or fork to vigorously mix the eggs and cream together until they are well combined. This process ensures that the eggs are thoroughly beaten and blended with the cream, creating a smooth and uniform mixture.
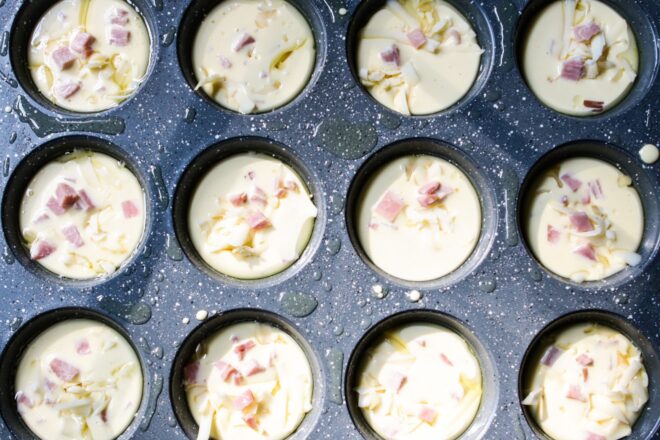
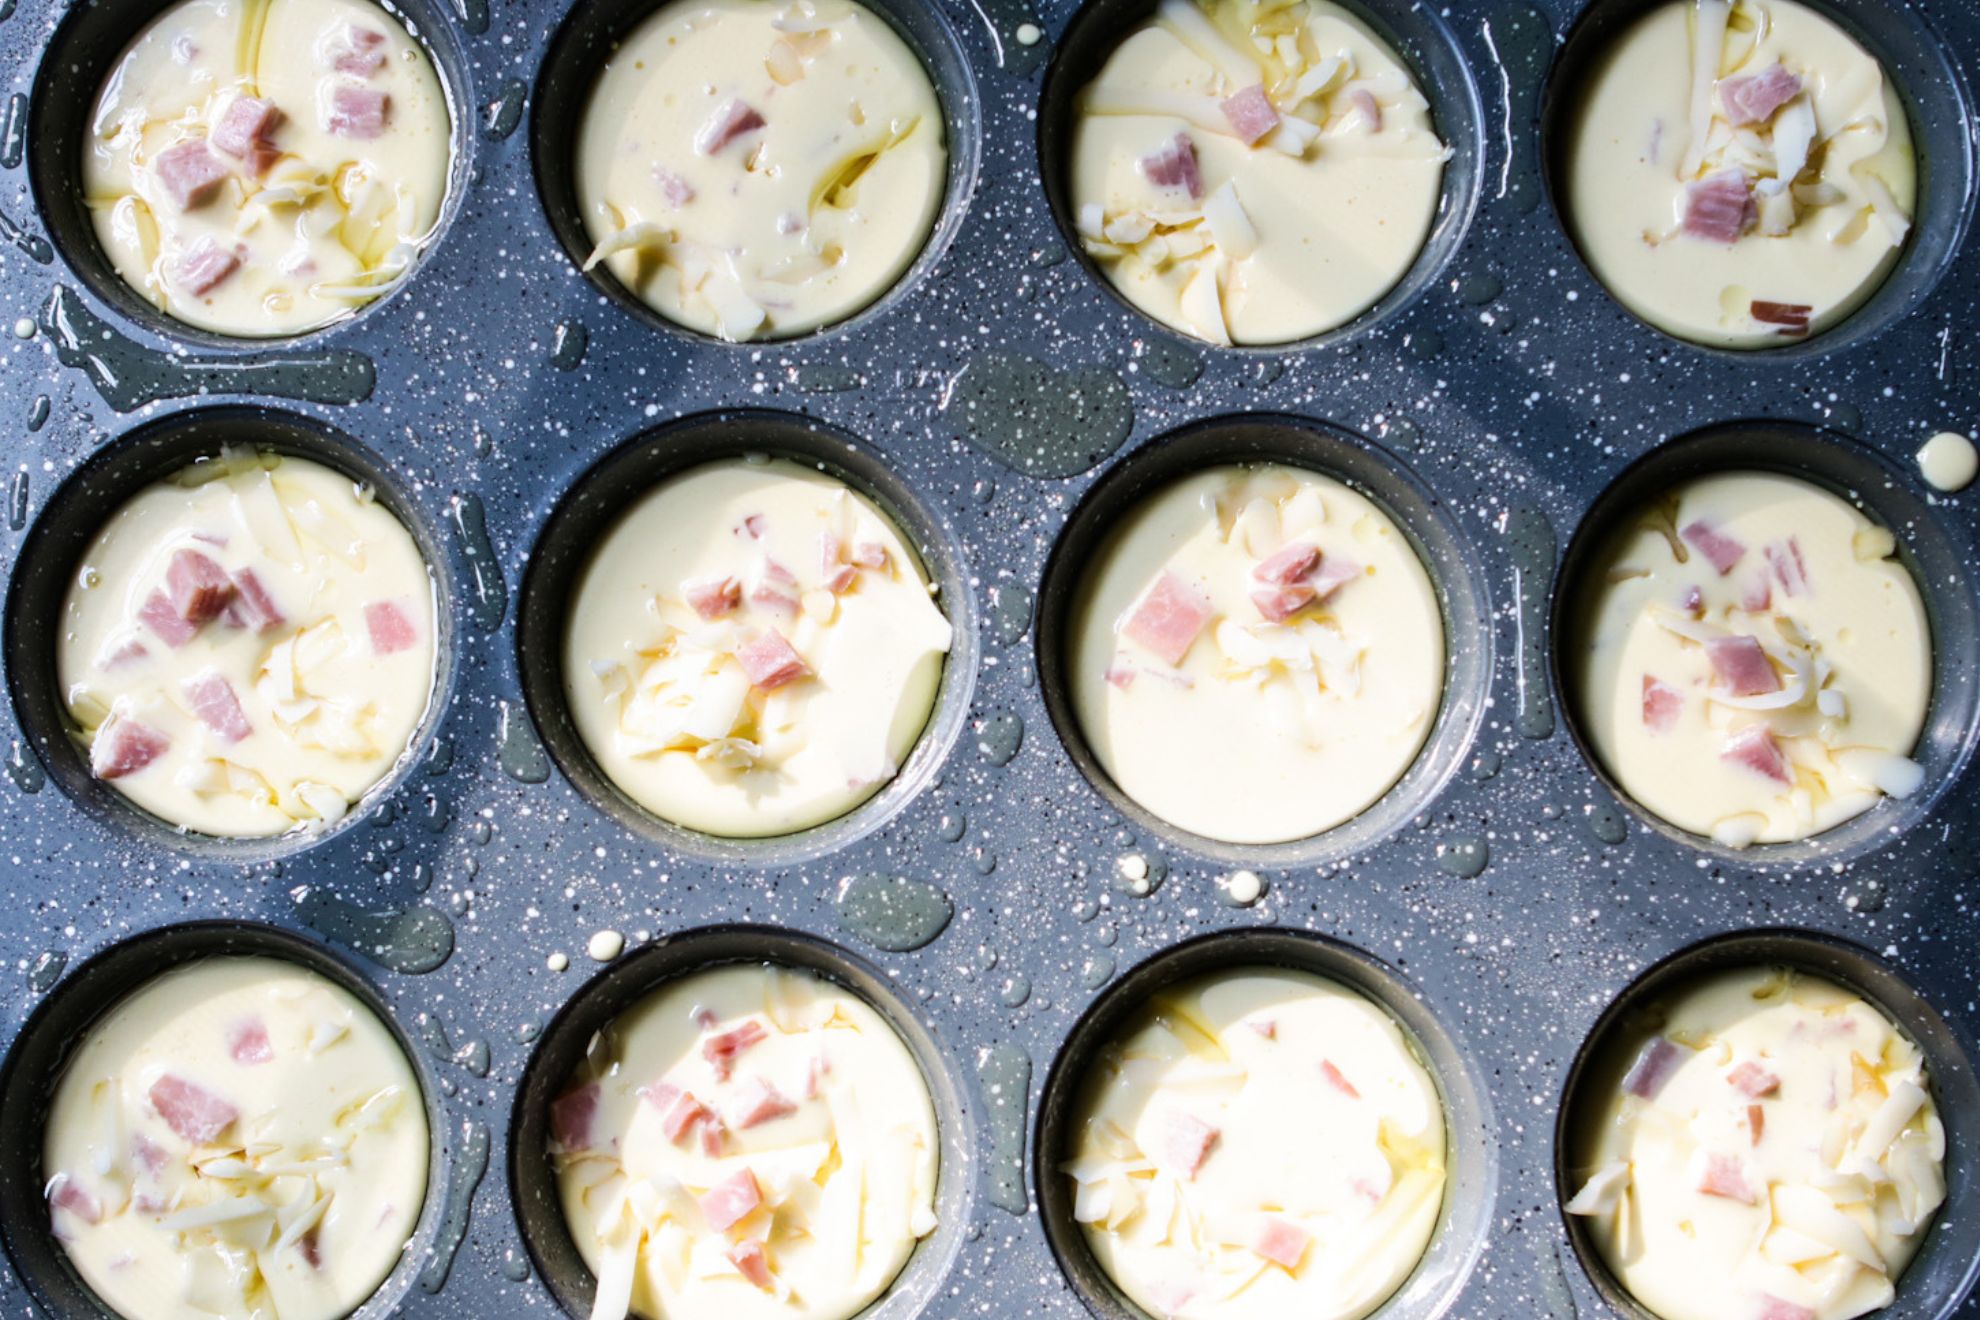
  3. Spray. Use a cooking spray, such as avocado spray, to coat the muffin tin thoroughly. This step prevents the quiches from sticking to the tin during baking, making it easier to remove them later.
  4. Divvy. Pour the prepared egg mixture evenly into each of the 12 muffin cups, filling them about three-quarters of the way. Then, sprinkle a generous amount of shredded Gruyere cheese and diced ham on top of each quiche. The exact amounts can be adjusted according to personal preference.
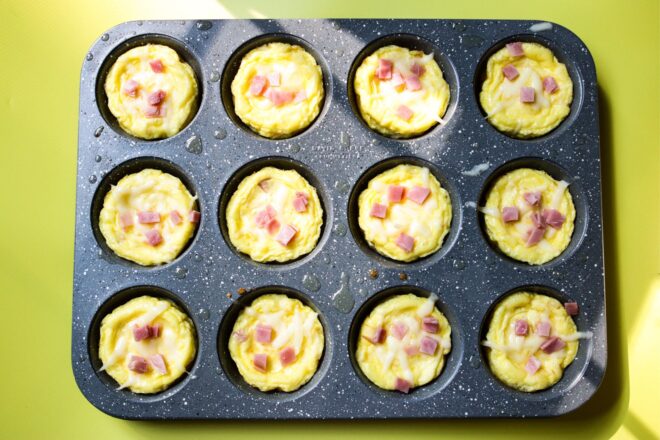
  5. Bake. Place the muffin tin in the oven and bake for approximately 15 minutes or until the quiches are set and the edges have puffed up. The cooking time may vary, so keep an eye on them to avoid overcooking.
  6. Cool. Once the quiches are done baking, remove them from the oven and allow them to cool in the muffin tin for around 5 minutes. During this time, the quiches will slightly deflate and settle.
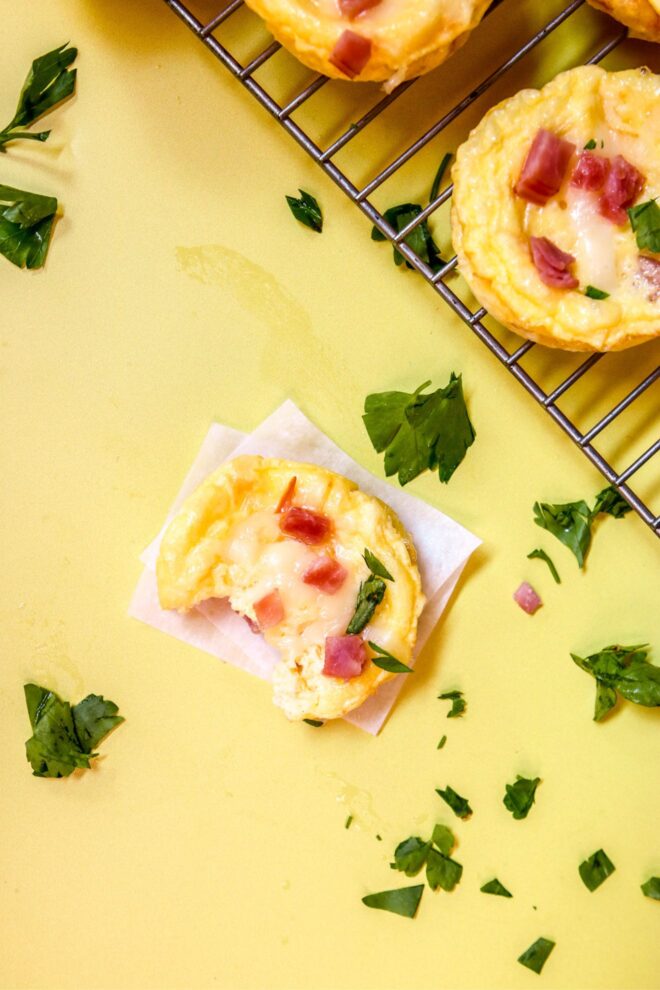
  7. Remove. Use a butter knife to gently loosen the edges of each quiche from the muffin tin. Slide the knife underneath each quiche to lift and transfer them to a cooling rack. This step helps prevent the quiches from sticking to the tin and allows them to cool evenly.
  8. Enjoy! For added flavor and presentation, sprinkle the cooled quiches with chopped herbs, such as parsley or chives. Enjoy the quiches while they are still warm or allow them to cool completely before storing. To store, transfer the quiches to an airtight container and refrigerate. They can be reheated for quick and easy breakfasts throughout the week.

Tips for Success

  1. Properly grease the muffin tin: Make sure to generously spray or grease the muffin tin with cooking spray or butter to prevent the quiches from sticking to the pan. This will make it easier to remove them once they are cooked.
  2. Don’t overfill the muffin cups: When dividing the egg mixture among the muffin cups, be careful not to overfill them. Leave some space at the top to allow the quiches to rise and puff up without overflowing during baking.
  3. Customize fillings: Feel free to customize the fillings based on your preferences. You can add different types of cheese, vegetables, herbs, or meats to create various flavor combinations. See some ideas below!
  4. Allow quiches to cool slightly: After removing the quiches from the oven, let them cool in the muffin tin for a few minutes. This will make them easier to handle and allow them to set slightly before transferring to a cooling rack.
  5. Use a butter knife to release the quiches: To remove the quiches from the muffin tin, gently run a butter knife around the edges of each quiche to loosen it from the pan. Then, slide the knife underneath to lift and transfer them to a cooling rack or serving plate.
This is an overhead vertical image of a silver cooling rack with muffin sized quiches on it in the top right corner of the image. The quiches are topped with melted cheese, chunks of ham, and chopped parsley. The cooling rack sits on a yellow surface. In the center of the image is a small crustless quiche on a white square of parchment paper. Chopped parsley is sprinkled around the yellow surface.

Muffin Tin Quiche Variations to Try

Vegetable Medley

Add a mix of sautéed vegetables such as bell peppers, onions, mushrooms, spinach, or zucchini. Sauté the vegetables beforehand to remove excess moisture and enhance their flavors.

Mediterranean Delight

Incorporate ingredients like diced tomatoes, Kalamata olives, feta cheese, and fresh herbs like oregano or basil. This combination provides a burst of Mediterranean flavors.

Bacon and Cheddar

Replace the ham with crispy cooked bacon and use shredded cheddar cheese instead of Gruyere. The smoky flavor of the bacon pairs well with the richness of the cheese.

Spinach and Feta

Sauté spinach until wilted and combine it with crumbled feta cheese. This combination offers a classic and tasty flavor combination.

Southwest Style

Add some spice to your quiches by mixing in diced green chilies, black beans, corn, and shredded Monterey Jack cheese. Top with a dollop of salsa or a sprinkle of cilantro for a vibrant and zesty twist.

Smoked Salmon and Dill

Use smoked salmon as the main filling and sprinkle fresh dill on top. This combination offers a delightful and elegant flavor profile.

Tex-Mex Twist

Use cooked ground beef or chicken seasoned with taco spices, along with diced tomatoes, black beans, and shredded Mexican cheese blend. Top with a dollop of guacamole or sour cream for a Tex-Mex flair.

How to Store u0026 Reheat

Cooling and Storing

Allow the quiches to cool completely before storing to prevent condensation and maintain their texture.

Transfer the cooled quiches to an airtight container or wrap them tightly in plastic wrap.

Label the container with the date to keep track of freshness.

Store the quiches in the refrigerator for 3-4 days.

Reheating

Microwave: Place individual quiches on a microwave-safe plate and heat them in 20-30 second intervals until warmed through. Be cautious not to overheat, as it can make the quiches rubbery.

Oven: Preheat the oven to around 350°F (175°C). Arrange the quiches on a baking sheet and warm them for 10-15 minutes or until heated to your liking.

Freezeing Muffin Tin Quiches

Allow the quiches to cool completely after baking.

Wrap each quiche individually in plastic wrap or place them in airtight freezer bags.

Label the packaging with the date and contents.

Store the quiches in the freezer for up to 2-3 months.

To reheat frozen quiches, thaw them overnight in the refrigerator before following the reheating instructions mentioned above.

More Eggy Recipes!

Caramelized Onion Bacon Gruyere Quiche

Bacon + Blue Cheese Egg Muffins

Cheesy Muffin Tin Egg Bites with Hashbrowns

Cheesy Pepper Sausage Keto Breakfast Casserole (only 15 min to prep!!)

Did you make this? Leave a review below and tag me on Instagram, Facebook, or Pinterest!

This is an overhead vertical image of a silver cooling rack with muffin sized quiches on it. The quiches are topped with melted cheese, chunks of ham, and chopped parsley. The cooling rack sits on a yellow surface. Recipe
GF Gluten-Free NF Nut-Free

20-Min Crustless Muffin Tin Quiche

Muffin tin quiches are packed with flavorful fillings and perfect for on-the-go meals or meal prep. They’re simple to make and customizable!

Recipe by:Lindsay Grimes
5 Stars 4 Stars 3 Stars 2 Stars 1 Star No reviews
Prep: 5 minCook: 15 minTotal: 20 min
Print recipe Rate recipe Pin Save recipe
Servings: 12 1x

Ingredients

  • 6 eggs
  • 1 cup heavy cream
  • 1/2 cup shredded cheese
  • 1/2 cup cubed ham
  • chopped herbs (optional)

Instructions

  1. Preheat oven to 350F.
  2. Add the eggs and cream to a medium bowl.
    This is an overhead horizontal image of a large scalloped milk glass bowl on a yellow surface. In the bowl are six eggs and heavy cream.
  3. Whisk together until combined.
    This is an overhead horizontal image of a large scalloped milk glass bowl on a yellow surface. In the bowl is a slightly yellow creamy mixture and a whisk dipped into it. The silver whisk has a black handle and is leaning against the side of the bowl pointing at the bottom right corner of the image.
  4. Generously spray your 12 cup muffin tin with cooking spray. I used avocado spray. Divide the egg mixture between the muffin tins and add a some shredded cheese and ham on top. I usually just eyeball the amount I add to each muffin cup and divvy the goodies up between the 12 muffin cups.
    This is an overhead horizontal image of a 12 cup muffin tin. The grey speckled muffin tin has oil sprayed on it and each muffin cup is filled with a raw creamy egg mixture with chunks of ham and shredded cheese.
  5. Bake for 15 minutes. The edges will puff up but they will fall back down to a flat(ish) top once they cool. Cool for about 5 minutes.
    This is an overhead horizontal image of a 12 cup muffin tin. The grey speckled muffin tin has oil sprayed on it and each muffin cup is filled with baked egg quiches topped with chunks of ham and cheese. The muffin tin sits on a yellow surface.
  6. Glide a butter knife around the edges of the muffin and under the mini quiche to lift them up and transfer to a cooling rack. Sprinkle with chopped herbs and enjoy immediately. Or, allow to cool completely before transferring to an airtight container and storing in the fridge for quick and easy breakfasts.
    This is an overhead horizontal image of a silver cooling rack with muffin sized quiches on it. The quiches are topped with melted cheese, chunks of ham, and chopped parsley. The cooling rack sits on a yellow surface.

Nutrition Info:

  • Serving Size: 1
  • Calories: 115
  • Sugar: 0.7g
  • Sodium: 394mg
  • Fat: 8.2g
  • Saturated Fat: 4.2g
  • Unsaturated Fat: 0g
  • Trans Fat: 0g
  • Carbohydrates: 1.5g
  • Fiber: 0g
  • Protein: 8.7g
  • Cholesterol: 115mg
© The Toasted Pine Nut

Did you make this?

I love seeing what you made! Tag me on social @thetoastedpinenut

Rate recipe Tag me on Instagram
This is an overhead vertical image of a silver cooling rack with muffin sized quiches on it. The quiches are topped with melted cheese, chunks of ham, and chopped parsley. The cooling rack sits on a yellow surface. Text overlay reads "muffin tin quiches so simple & delish!"
43 shares
  • Share
  • Tweet
  • Email
overhead image of a gluten free sprinkle cookie with a bite taken out on a white counter

Never miss a recipe!

Join our pine nut family and get recipes delivered right to your inbox.

Join now!
15 no bake desserts

You May Also Like...

  • overhead image of a muffin tin filled with 12 raw eggs sprinkled with pepper
    Perfect Oven-Baked Eggs in a Muffin Tin
  • This is an overhead vertical image looking at a white plate with three cooked eggs in muffin liners. The egg bites are topped with drips of hot sauce and basil leaves on top and around the cups. A couple handfuls of raspberries are to the right of the egg cups. A knife is leaning on the side of the white plate at an angle with the blade cut off on the right side of the image. The plate is on a white surface with a beige cloth to the bottom left corner of the image.
    Cheesy Muffin Tin Egg Bites with Hashbrowns
  • 20-Min Chocolate Peanut Butter Pie

Reader Interactions

Leave a Comment & Rate this Recipe Cancel reply

If you love this recipe it would mean SO MUCH to me if you give it a star rating and leave a comment about it. Not only do I love basking in the glory of your recipe love, but (perhaps more importantly 😋) it helps other readers find my recipes online. Thanks so much for your feedback!!

Have a question? Submit your question or comment below. Your email address will not be published. Required fields are marked *

Recipe rating 5 Stars 4 Stars 3 Stars 2 Stars 1 Star

Primary Sidebar

Lindsay

Nice to Meet You!

I’m Lindsay - cookbook author, blogger and chocolate lover! If gluten-free desserts are your jam, you’re in the right place! I live in south Jersey with my family and new puppy Roxie! Some of my favorite things are oat milk lattes, sunny days and warm, gooey chocolate chip cookies.

Read more...

Recipe Key

GF Gluten-Free DF Dairy-Free V Vegan VG Vegetarian EF Egg-Free NF Nut-Free P Paleo Browse All

Most Popular

This is a horizontal image of a hand with deep pink nail polish holding a chocolate quinoa crisp in between their thumb and pointer finger. More chocolate quinoa crisps are blurred in the background.

5-Minute Crunchy Chocolate Quinoa Crisps

overhead image of a muffin tin filled with 12 raw eggs sprinkled with pepper

Perfect Oven-Baked Eggs in a Muffin Tin

This is a side view of a chocolate almond butter bar with a bite taken out of it. The bar sits on a white piece of parchment paper and is sprinkled with salt. More bars are blurred in the background.

No Bake Almond Butter Bars

Lemon & Avocado Kale Salad

Freebie alert!

Get My Free No Bake Desserts eBook!

Explore

More Breakfast

This is an overhead horizontal image of a white plate with mini pancakes on it. A fork is piercing three pancakes and leaning on the plate on top of the rest of the pancakes. A small white bowl with syrup is on the plate and has been drizzled on top of the pancakes. Cherries are on the plate and one cherry is off the plate in the bottom right corner on the white surface.

Perfectly Pop-able Mini Pancakes in 15 minutes

his is a vertical image looking at a glass jar with deep purple oats and blueberries in it from the side. A silver spoon is dipping into the oats with the handle leaning against the back rim of the jar pointing to the top left corner. The jar sits on a white tile surface with blueberries scattered around it.

Juicy Lemon Blueberry Overnight Oats with Water

This is a vertical image looking at a glass jar from the side. In the glass jar are layers of graham cracker crumbs, strawberry jam, and a light pink almost white mixture with specks of seeds in it. A silver spoon is in the jar scooping up the oats and leaning against the side of the jar. Another glass jar with similar layers is behind the fro centered jar blurred in the background. The jars sit on a white square tile surface.

Swanky Strawberry Cheesecake Overnight Oats with Strawberry Jam

This is a vertical overhead image looking at a small glass jar. In the jar are deep brown colored overnight oats with a silver spoon sticking out and leaning against the left side of the jar, pointing to the bottom left corner of the image. The jar sits on a white terrazzo surface with a few whole coffee beans and brown sugar scattered around the jar.

Brewed Coffee Overnight Oats with Oat Milk

Browse All
15 No bake desserts

Download my FREE No Bake Dessert Ebook!

As seen on:

Food Network
Shape
Men's Health
NBC
Kitchn
Glamour
  • Reader Faves: Gluten-Free Desserts
    • Gluten free macarons
    • Banana mug cake
    • Almond butter bars
    • Peanut butter Cheerio bars
    • Chia seed cookies
    • More gluten-free desserts
  • Top Chocolate Desserts
    • Chocolate quinoa crisps
    • Microwave baked oats
    • Hot chocolate bombs
    • Chocolate banana bread
    • Peanut butter brownies
    • All chocolate recipes
  • DIY & How To
    • Dried orange garland
    • How to melt chocolate chips
    • DIY face oil
    • Oven-baked eggs in a muffin tin
    • How to make taco seasoning
    • How to make oat milk in 5 minutes
  • Explore Resources
    • FAQ
    • My Baking Mixes
    • Cookbook
    • Shop Favorites
    • Web Stories
    • Meet Lindsay
Follow

@thetoastedpinenut

Accessibility

Privacy Policy

Disclaimer

Contact

© 2025 The Toasted Pine Nut
|
Site Credits Designed by Melissa Rose Design Developed by Once Coupled Support by Foodie Digital
Back to Top
43 shares