• Skip to primary navigation
  • Skip to main content
  • Skip to primary sidebar
  • About
  • Contact
Check out my new cookbook

The Toasted Pine Nut

fun. flavorful. feel-good recipes.

  • Check out my cookbook!
  • Recipes
    • Dessert
      • Cookies
      • Bars & Brownies
      • Breads & Muffins
      • Cakes & Cupcakes
      • Pies & Crumbles
      • Candy
      • No Bake
    • Meal
      • Breakfast
      • Main Dishes
      • Appetizers
      • Sides
      • Snacks
      • Drinks
      • Salads
      • Sauces & Dips
      • Dessert
    • Diet
      • Gluten Free
      • Dairy Free
      • Vegan
      • Vegetarian
      • Egg Free
      • Kid Friendly
      • Low Carb
      • Nut Free
    • Meat
      • Fish & Seafood
      • Chicken & Poultry
      • Beef & Pork
      • Meatless
    • Method
      • Air Fryer
      • Slow Cooker
      • Instant Pot
      • Oven
      • Grill
      • Stovetop
    • Season
      • Spring
      • Summer
      • Fall
      • Winter
    • Recipe Filter
  • Shop
    • My Baking Mixes
    • Kitchen Essentials
    • Pantry Items
    • Kid Favorites
    • Photography
  • Cookbook
  • Videos
Home Recipes Desserts Candy
Leave a Review

20-Min Homemade Turtles Candy

20 min
GF Gluten-Free DF Dairy-Free V Vegan VG Vegetarian EF Egg-Free P Paleo
by: Lindsay Grimes
August 11, 2017 (Updated: September 21, 2024)
Jump to Recipe
Leave a Comment

This post may contain affiliate links. Please read our disclosure policy.

Homemade Candy Turtles
Homemade turtles are a fun candy you can make at home that are so delicious you won’t even care they’re dairy free and vegan!

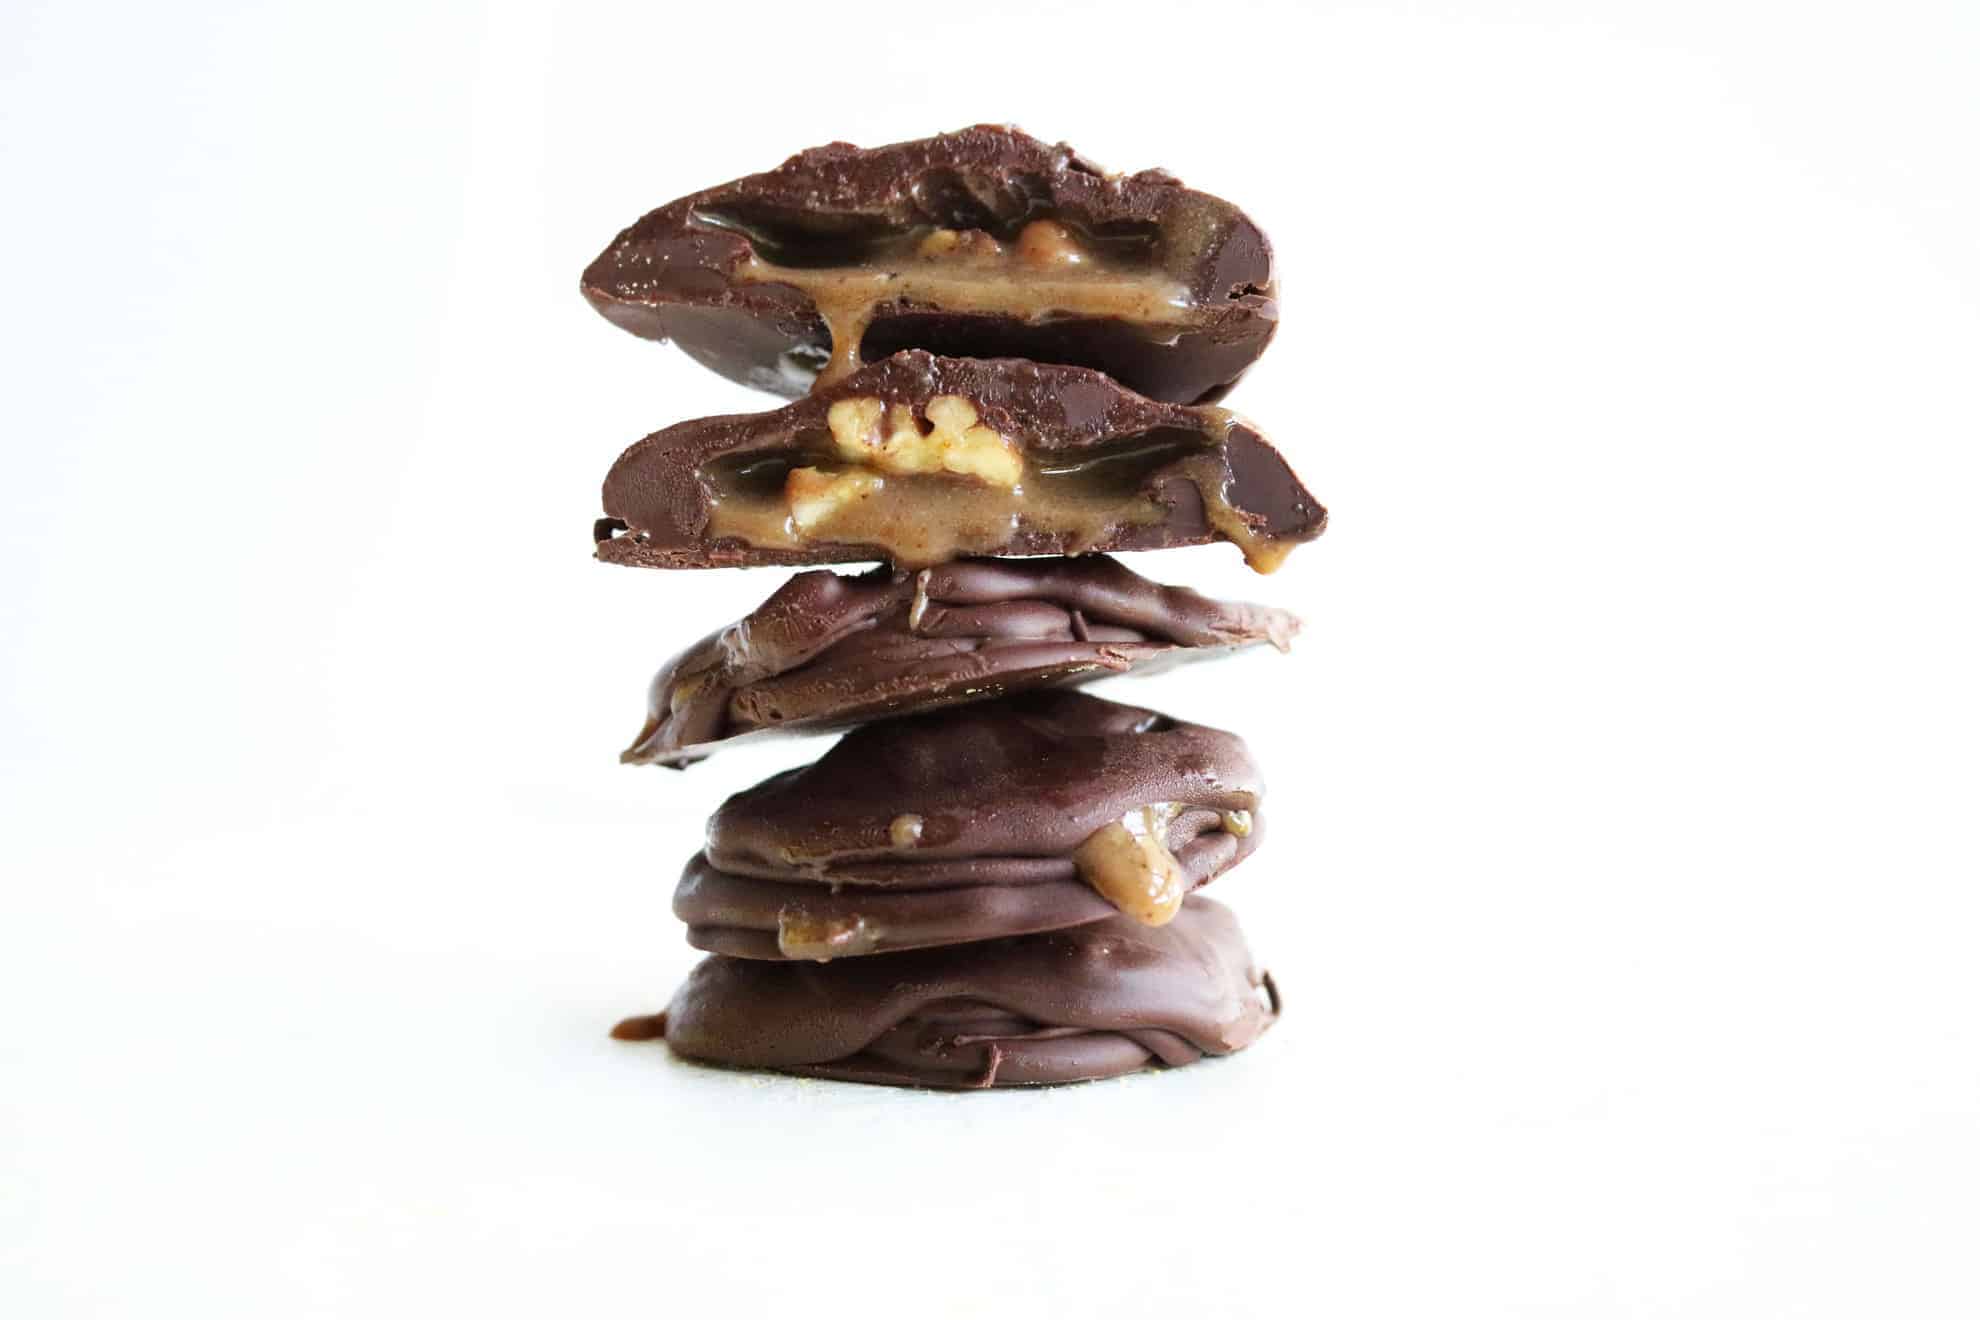
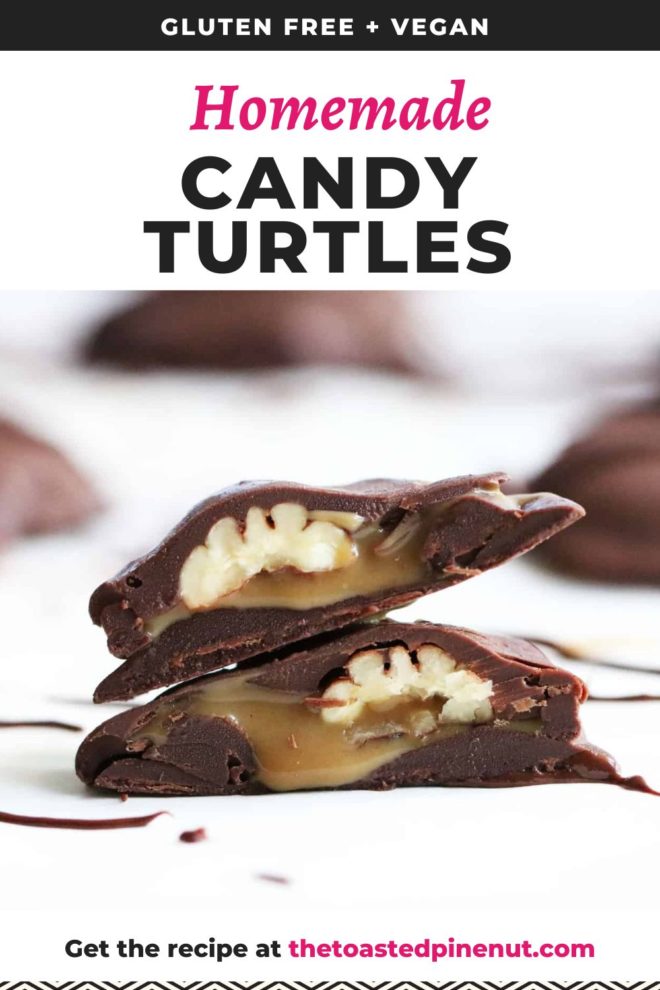
Homemade turtles are so easy to make, once you get the hang of it, you won’t be able to stop making them!

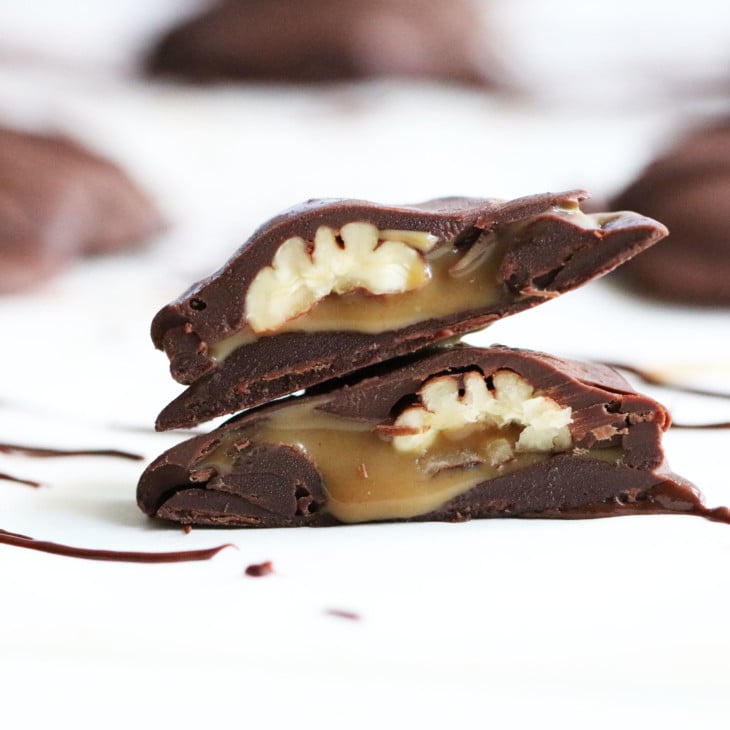
I remember the first time I had a “turtle.” I remember being a hardcore candy bar fan and being taken aback by the unexpected deliciousness of these unknown little mounds of tasty. Chocolate outer with gooey caramel center? Extra bonus points for that nutty crunch? Why did nobody tell me?!

The combo is such a simple swipe of genius I couldn’t believe it took me so long to try and obsess over. I was living under a rock, apparently. No, no in a turtle shell!! I was living in some sort of turtle shell!! Bahh you get what I’m saying 🙂 

Here’s what I like about turtles. As you eat them, the caramel gets on your fingers. Then, when you’re all bummed out that the turtle is gone and your fleeting chocolate bliss has ended, you get to lick the caramel off your fingers as if a tasty little encore to ease you into dessert doneness.

You don’t need to be an expert candy maker to make these beauts. Trust me, I am not. Anybody can make these!! I purposefully made these without any extra fancy stuff. No candy thermometer. No molds (though totally welcome if you want them to be nice and tidy). Anyone can make these and I can’t urge you enough to DO it.

If you love homemade candy, try these Homemade Snickers Bars, Chocolate Quinoa Crisps, and Homemade Vegan Twix Bars.

Homemade Candy Turtles

Ingredients for Homemade Turtles:

  • coconut cream
  • coconut sugar
  • vanilla
  • salt
  • chocolate chips
  • refined coconut oil
  • whole pecans

How to Make Homemade Candy Turtles:

Make the Caramel

First, make your caramel. This is something you want to make a few hours in advance, though if you can make it the day before, even better!

Pour the coconut cream and coconut sugar in a saucepan over medium heat. Whisk frequently until it thickens, about 10 – 15 minutes. Once it’s thickened, reduce the heat to low and add the vanilla, and sea salt. Whisk to combine.

Once nice and combined, remove from heat and allow it to come to room temperature.

Once cool, place in an airtight container in the fridge for 3+ hours. If you can leave the caramel for 12 – 24 hours, even better!

Make the turtles

Heat the chocolate chips for a minute in the microwave. For a tutorial, check out my post for How to Melt Chocolate Chips. Add the coconut oil and continue to stir until the chocolate is smooth and creamy.

Depending on your microwave, you may need to heat the chocolate for another 30 seconds to 1 minute.

On a baking sheet lined with parchment paper, make 12 chocolate circles about the size of a POG. Remember those?! For those of you that don’t know what the heck I’m talking about, make the circles about 3 inches across. Pop in the freezer for a couple minutes for the chocolate to harden.

Homemade Candy Turtles

Then, use a spoon to outline the chocolate circles with more chocolate and place it in the freezer to harden for a minute. This “outline” will create a nice wall so that the caramel won’t pour out the sides. Repeat the outline one more time and place it in the freezer to harden for a minute.

Add a scoop of caramel to the center of the chocolate. Top with a pecan. Spoon the chocolate onto the top to cover the caramel and pecan. Though, you could probably just eat them without the chocolate topping.

Pop them in the freezer for another minute or two to set the top chocolate. Store in the fridge until you’re ready to eat!

Homemade Candy Turtles

Did you make this? Leave a review below and tag me on Instagram, Facebook, or Pinterest!

Recipe
GF Gluten-Free DF Dairy-Free V Vegan VG Vegetarian EF Egg-Free P Paleo

20-Min Homemade Turtles Candy

Homemade turtles are a fun candy you can make at home that are so delicious you won’t even care they’re dairy free and vegan!

Recipe by:Lindsay Grimes
5 Stars 4 Stars 3 Stars 2 Stars 1 Star No reviews
Prep: 0 minCook: 20 minsTotal: 20 min
Print recipe Rate recipe Pin Save recipe
Servings: 12 1x

Ingredients

  • 11 oz. coconut cream
  • 1/2 cup coconut sugar
  • 1 teaspoon vanilla
  • 1/4 teaspoon sea salt
  • 1 cup 60% cacao dark chocolate chips
  • 1 tablespoon refined coconut oil
  • 12 raw whole pecans

Instructions

  1. Pour the coconut cream and coconut sugar in a saucepan over medium heat.
  2. Whisk frequently until it thickens, about 10 – 15 minutes.
  3. Once it’s thickened, reduce the heat to low and add the vanilla and sea salt.
  4. Once nice and combined, remove from heat and allow it to come to room temperature, Stirring occasionally.
  5. Once cool, place in an airtight container in the fridge for 3+ hours. If you can leave the caramel for 12 – 24 hours, even better!
  6. Make the turtles: heat the chocolate chips for a minute in the microwave.
  7. Add the coconut oil and continue to stir until the chocolate is smooth and creamy.
  8. On a baking sheet lined with parchment paper, make 12 chocolate circles about 3 inches in diameter.
  9. Pop in the freezer for a couple minutes for the chocolate to harden.
  10. Use a spoon to outline the chocolate circles and place it in the freezer to harden for a minute. This “outline” will create a nice wall so that the caramel won’t pour out the sides.
  11. Repeat the outline one more time and place it in the freezer to harden for a minute.
  12. Add a scoop of caramel to the center of the chocolate.
  13. Top with a pecan.
  14. Spoon the chocolate onto the top to cover the caramel and pecan.
  15. Place it in the freezer for another minute or two to set the top chocolate.
  16. Store in the fridge until you’re ready to eat!
© The Toasted Pine Nut

Did you make this?

I love seeing what you made! Tag me on social @thetoastedpinenut

Rate recipe Tag me on Instagram

These are so tasty, enjoy!! xo

)

97 shares
  • Share
  • Tweet
  • Email
overhead image of a gluten free sprinkle cookie with a bite taken out on a white counter

Never miss a recipe!

Join our pine nut family and get recipes delivered right to your inbox.

Join now!
15 no bake desserts

You May Also Like...

  • overhead image of a warm beverage with whipped cream, a cinnamon stick, and spice sprinkled on top
    Festive 5-Minute Gingerbread Hot Chocolate
  • Homemade Samoas Cookies (gluten free)
  • Homemade Tagalong Cookies

Reader Interactions

Leave a Comment & Rate this Recipe Cancel reply

If you love this recipe it would mean SO MUCH to me if you give it a star rating and leave a comment about it. Not only do I love basking in the glory of your recipe love, but (perhaps more importantly 😋) it helps other readers find my recipes online. Thanks so much for your feedback!!

Have a question? Submit your question or comment below. Your email address will not be published. Required fields are marked *

Recipe rating 5 Stars 4 Stars 3 Stars 2 Stars 1 Star

Primary Sidebar

Lindsay

Nice to Meet You!

I’m Lindsay - cookbook author, blogger and chocolate lover! If gluten-free desserts are your jam, you’re in the right place! I live in south Jersey with my family and new puppy Roxie! Some of my favorite things are oat milk lattes, sunny days and warm, gooey chocolate chip cookies.

Read more...

Recipe Key

GF Gluten-Free DF Dairy-Free V Vegan VG Vegetarian EF Egg-Free NF Nut-Free P Paleo Browse All

Most Popular

This is a horizontal image of a hand with deep pink nail polish holding a chocolate quinoa crisp in between their thumb and pointer finger. More chocolate quinoa crisps are blurred in the background.

5-Minute Crunchy Chocolate Quinoa Crisps

overhead image of a muffin tin filled with 12 raw eggs sprinkled with pepper

Perfect Oven-Baked Eggs in a Muffin Tin

This is a side view of a chocolate almond butter bar with a bite taken out of it. The bar sits on a white piece of parchment paper and is sprinkled with salt. More bars are blurred in the background.

No Bake Almond Butter Bars

Lemon & Avocado Kale Salad

Freebie alert!

Get My Free No Bake Desserts eBook!

Explore

More Candy

This is an overhead vertical image of a white ceramic scalloped pie dish on a deep pink surface. In the pie dish is a melty, gooey chocolate topped with toasted marshmallows. Nilla wafers are scattered on the pink surface and a few are dipped into the chocolate dip.

10 Minute Warm & Gooey Hot Chocolate Dip

This is a vertical image looking at a 3/4 view onto two banana bites stacked ontop of each other. The banana bites have two layers. The bottom layer is a light beige color and the top layer is a hardened chocolate with crispy quinoa. More banana bites are in front and back of the stacked two.

Two-Bite Crispy Chocolate Peanut Butter Banana Bites

This is a vertical image looking from the side at a stack of 4 peanut butter fudge squares stacked. The stack sits on a deep pink surface with more squares blurred in the white background.

Rich & Creamy Microwave Peanut Butter Fudge (only 3 ingredients!)

This is a vertical image looking at a stack of chocolate bars from the side. The chocolate has tons of hazelnuts in it. The stack sits on a dark pink counter with more chocolate pieces and crumbs blurred in around the stack and in the background. The stack sits against a white background.

Quick & Easy Coffee Hazelnut Chocolate Bars (only 4 ingredients!)

Browse All
15 No bake desserts

Download my FREE No Bake Dessert Ebook!

As seen on:

Food Network
Shape
Men's Health
NBC
Kitchn
Glamour
  • Reader Faves: Gluten-Free Desserts
    • Gluten free macarons
    • Banana mug cake
    • Almond butter bars
    • Peanut butter Cheerio bars
    • Chia seed cookies
    • More gluten-free desserts
  • Top Chocolate Desserts
    • Chocolate quinoa crisps
    • Microwave baked oats
    • Hot chocolate bombs
    • Chocolate banana bread
    • Peanut butter brownies
    • All chocolate recipes
  • DIY & How To
    • Dried orange garland
    • How to melt chocolate chips
    • DIY face oil
    • Oven-baked eggs in a muffin tin
    • How to make taco seasoning
    • How to make oat milk in 5 minutes
  • Explore Resources
    • FAQ
    • My Baking Mixes
    • Cookbook
    • Shop Favorites
    • Web Stories
    • Meet Lindsay
Follow

@thetoastedpinenut

Accessibility

Privacy Policy

Disclaimer

Contact

© 2025 The Toasted Pine Nut
|
Site Credits Designed by Melissa Rose Design Developed by Once Coupled Support by Foodie Digital
Back to Top
97 shares