• Skip to primary navigation
  • Skip to main content
  • Skip to primary sidebar
  • About
  • Contact
Check out my new cookbook

The Toasted Pine Nut

fun. flavorful. feel-good recipes.

  • Check out my cookbook!
  • Recipes
    • Dessert
      • Cookies
      • Bars & Brownies
      • Breads & Muffins
      • Cakes & Cupcakes
      • Pies & Crumbles
      • Candy
      • No Bake
    • Meal
      • Breakfast
      • Main Dishes
      • Appetizers
      • Sides
      • Snacks
      • Drinks
      • Salads
      • Sauces & Dips
      • Dessert
    • Diet
      • Gluten Free
      • Dairy Free
      • Vegan
      • Vegetarian
      • Egg Free
      • Kid Friendly
      • Low Carb
      • Nut Free
    • Meat
      • Fish & Seafood
      • Chicken & Poultry
      • Beef & Pork
      • Meatless
    • Method
      • Air Fryer
      • Slow Cooker
      • Instant Pot
      • Oven
      • Grill
      • Stovetop
    • Season
      • Spring
      • Summer
      • Fall
      • Winter
    • Recipe Filter
  • Shop
    • My Baking Mixes
    • Kitchen Essentials
    • Pantry Items
    • Kid Favorites
    • Photography
  • Cookbook
  • Videos
Home Recipes Desserts
Leave a Review

Red Velvet Whoopie Pies

30 min
by: Lindsay Grimes
December 12, 2018 (Updated: March 26, 2020)
Jump to Recipe
Leave a Comment

This post may contain affiliate links. Please read our disclosure policy.

Red Velvet Whoopie Pies
These grain free red velvet whoopie pies are filled with a thick and luscious homemade marshmallow cream and are the perfect dessert!

I have a thing for whoopie pies. My first whoopie pie experience were those oatmeal cookie sandwiches that had the most amazing frosting in the center. I remember one time going on a road trip and the rule was I could pick any snack I wanted for the car…

Red Velvet Whoopie Pies

I picked out a box of oatmeal cookie sandwiches and ate the whole damn box. They’re just so yummy. And that icing! Omg I’m just drooling thinking about it.

Here’s why I love whoopie pies. One. They are an excuse to eat TWO cookies instead of just one. It’s one unit that you can eat in one sitting, but it’s technically two cookies soooo… TWO. There is icing in the center that makes if feel like you’re having cookie cake. Three. Some whoopie pies are soft baked and pillowy. Some or chewy and gooey. Four. Um, I have no words besides they are amazing amazing amazing!

Red Velvet Whoopie Pies

Whoopie pies are a special treat that levels up dessert beyond just a cookie. It’s a double cookie sammie and I am HERE for it. So, let’s make some red velvet whoopie pies!!!

Cream together the coconut sugar and butter or ghee. Beat in the eggs, vanilla and food coloring to the bowl.

In a separate bowl, whisk together the almond flour, cocoa powder, baking powder, baking soda, and sea salt. Add the dry ingredients into the wet until fully incorporated.

Red Velvet Whoopie Pies

Using a large cookie scoop (about 1 + 1/2 tablespoons of cookie dough), scoop the cookie dough into evenly sized balls on a cookie sheet lined with a silpat or parchment paper. You should end up with 12 cookies.

Bake for 10 minutes, and cool on a wire rack. While the cookies cool, make the marshmallow cream filling.

Red Velvet Whoopie Pies

Add the honey and 2 tablespoons of water to a small saucepan.

Add the remaining water to a bowl or the bowl of a standing mixer with the gelatin.

Place the saucepan over medium heat. Bring the mixture to a boil, and allow it to boil for 5 minutes. Promptly remove the saucepan from the heat after 5 minutes.

Red Velvet Whoopie Pies

Using a hand or standing mixer, beat the gelatin while slowly streaming in the honey and water mixture.

Whip this for about 1 minute and 30 seconds, or until a glossy cream remains in the bowl. Do not over mix this, it will turn into a marshmallow consistency and be hard to spread.

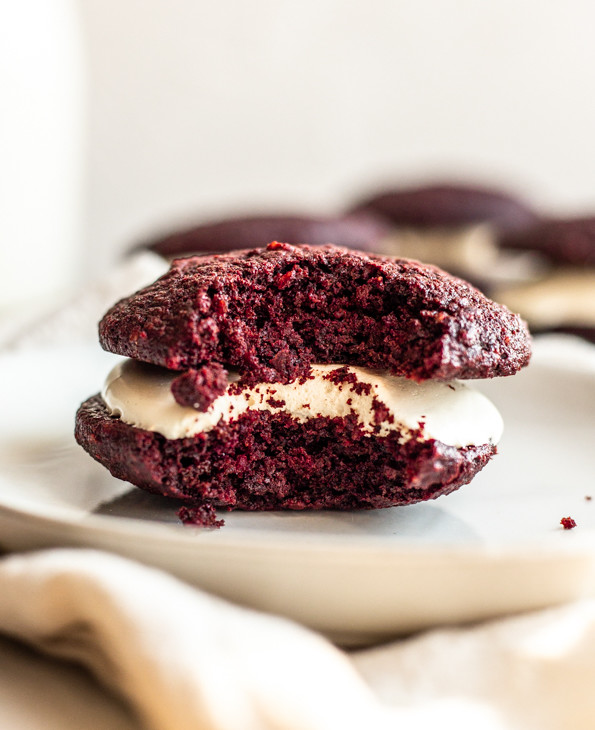
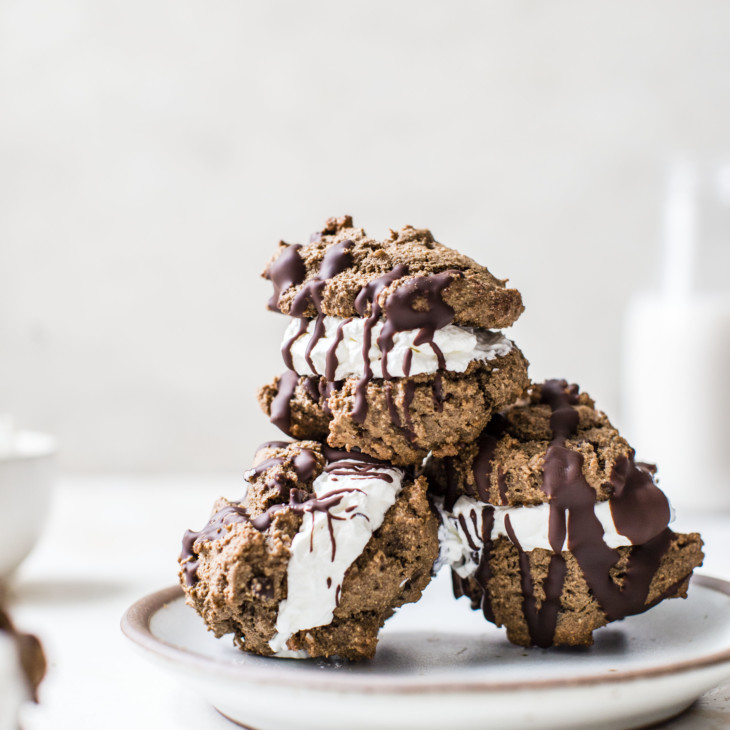
While the marshmallow cream is still warm, spread a layer on the bottom of 6 of the cookies. Top with the remaining cookies and serve!

Red Velvet Whoopie Pies

Did you make this? Leave a review below and tag me on Instagram, Facebook, or Pinterest!

Recipe

Red Velvet Whoopie Pies

These soft grain free gorgeous red velvet sandwich cookie sandwiches are filled with a thick and luscious homemade marshmallow cream. They are the perfect special dessert!

Recipe by:Lindsay Grimes
5 Stars 4 Stars 3 Stars 2 Stars 1 Star No reviews
Prep: 15 minCook: 15 minTotal: 30 min
Print recipe Rate recipe Pin Save recipe
Servings: 6 1x

Ingredients

  • 1/2 cup coconut sugar
  • 5 tablespoons softened grass-fed butter or ghee
  • 2 room temperature eggs, beaten
  • 1 teaspoon vanilla
  • A few drops of natural red food coloring
  • 3/4 cup almond flour
  • 1/3 cup + 1 tablespoon cocoa powder
  • 1/2 teaspoon baking powder
  • 1/4 teaspoon baking soda
  • 1 pinch sea salt
  • 1/4 cup honey
  • 1/4 cup water, divided
  • 1 tablespoon beef gelatin powder

Instructions

  1. Preheat the oven to 350 F.
  2. Cream together the coconut sugar and butter or ghee.
  3. Beat in the eggs, vanilla and food coloring.
  4. In a separate bowl, whisk together the almond flour, cocoa powder, baking powder, baking soda, and sea salt.
  5. Add the dry ingredients into the wet until fully incorporated.
  6. Using a large cookie scoop (about 1 + 1/2 tablespoons of cookie dough), scoop the cookie dough into evenly sized balls on a cookie sheet lined with a silpat or parchment paper. You should end up with 12 cookies.
  7. Bake for 10 minutes, and cool on a wire rack.
  8. While the cookies cool, make the marshmallow cream filling.
  9. Add the honey and 2 tablespoons of water to a small saucepan.
  10. Add the remaining water to a bowl or the bowl of a standing mixer with the gelatin.
  11. Place the saucepan over medium heat. Bring the mixture to a boil, and allow it to boil for 5 minutes. Promptly remove the saucepan from the heat after 5 minutes.
  12. Using a hand or standing mixer, beat the gelatin while slowly streaming in the honey and water mixture.
  13. Whip this for about 1 minute and 30 seconds, or until a glossy cream remains in the bowl. Do not over mix this, it will turn into a marshmallow consistency and be hard to spread.
  14. While the marshmallow cream is still warm, spread a layer on the bottom of 6 of the cookies.
  15. Top with the remaining cookies and serve!

Tips

  • It’s important to remove the honey and water mixture at exactly 5 minutes, or the honey will cook too much, and you won’t be able to get the right consistency of marshmallow cream.
  • It’s also important to stop whipping the gelatin and honey mixture as soon as that glossy cream texture is reached as it will be too hard to spread otherwise.
  • Spread the marshmallow cream while warm for easy and pretty spreading.
© The Toasted Pine Nut

Did you make this?

I love seeing what you made! Tag me on social @thetoastedpinenut

Rate recipe Tag me on Instagram

Enjoy!! xo

BIG thank you to my friend Allie from Miss Allie’s Kitchen for creating this delicious recipe and taking these gorgeous images for us!! I love her work and couldn’t be more excited she’s creating some tasty dishes to share here too!

These grain free red velvet whoopie pies are filled with a thick and luscious homemade marshmallow cream and are the perfect dessert! thetoastedpinenut.com #thetoastedpinenut #glutenfree #grainfree #paleofriendly #redvelvet #whoopiepies #cookies #glutenfreecookies #grainfreecookies #refvelvetcookies #redvelvetwhoopiepies

307 shares
  • Share
  • Tweet
  • Email
overhead image of a gluten free sprinkle cookie with a bite taken out on a white counter

Never miss a recipe!

Join our pine nut family and get recipes delivered right to your inbox.

Join now!
15 no bake desserts

You May Also Like...

  • No Bake Red Velvet Truffles
  • Fudgy Frozen Whoopie Pies
  • Gluten Free Red Velvet Cookie Skillet

Reader Interactions

Leave a Comment & Rate this Recipe Cancel reply

If you love this recipe it would mean SO MUCH to me if you give it a star rating and leave a comment about it. Not only do I love basking in the glory of your recipe love, but (perhaps more importantly 😋) it helps other readers find my recipes online. Thanks so much for your feedback!!

Have a question? Submit your question or comment below. Your email address will not be published. Required fields are marked *

Recipe rating 5 Stars 4 Stars 3 Stars 2 Stars 1 Star

  1. AvatarRanee says

    Posted on 7/21/19 at 12:23 pm

    If I were to leave out the coco powder, would
    I need to use more almond flour?

    Reply
    • Lindsay Grimes Freedman says

      Posted on 8/11/20 at 7:43 am

      Yes, I think it would be best to add in some extra almond flour. Let me know how you make out! xo

      Reply

Primary Sidebar

Lindsay

Nice to Meet You!

I’m Lindsay - cookbook author, blogger and chocolate lover! If gluten-free desserts are your jam, you’re in the right place! I live in south Jersey with my family and new puppy Roxie! Some of my favorite things are oat milk lattes, sunny days and warm, gooey chocolate chip cookies.

Read more...

Recipe Key

GF Gluten-Free DF Dairy-Free V Vegan VG Vegetarian EF Egg-Free NF Nut-Free P Paleo Browse All

Most Popular

This is a horizontal image of a hand with deep pink nail polish holding a chocolate quinoa crisp in between their thumb and pointer finger. More chocolate quinoa crisps are blurred in the background.

5-Minute Crunchy Chocolate Quinoa Crisps

overhead image of a muffin tin filled with 12 raw eggs sprinkled with pepper

Perfect Oven-Baked Eggs in a Muffin Tin

This is a side view of a chocolate almond butter bar with a bite taken out of it. The bar sits on a white piece of parchment paper and is sprinkled with salt. More bars are blurred in the background.

No Bake Almond Butter Bars

Lemon & Avocado Kale Salad

Freebie alert!

Get My Free No Bake Desserts eBook!

Explore

More Desserts

This is a vertical image looking down onto a white piece of parchment paper with a piece of coffee cake leaning on its side so you can see the thick layer of crumble topping and fluffy tender cake. The cake leans against another piece of coffee cake to the bottom right corner of the image. Another piece of coffee cake is in the top left corner of the image. Some caramel and crumbs are on the parchment paper to the bottom left corner of the image.

Tender Gluten Free Coffee Cake with Cottage Cheese

This is an overhead vertical image of a gold cooling rack with cookies on it. The cookies are studded with blueberries and have a lemon curd pool in the middle. The cooling rack is in a light grey surface.

Bright Blueberry Studded Lemon Curd Cookies with Almond Flour

This is a vertical image looking at a cherry cheesecake square from the side. The cheesecake is light pink, has a graham cracker crust, and swirls of cherry jam on top. A silver fork has a bite of cheesecake on it and lies on the white surface in front of the cheesecake square. More cherry cheesecake squares are blurred behind and to the side of the slice in focus.

Silky Sweet No Bake Cherry Cheesecake (with cherry jam!)

This is an overhead vertical image of a silver cooling rack with mini chocolate chip cookies piled on top. The image focuses on the bottom left corner of the cooling rack with the rest of the cooling rack out of frame. The cooling rack sits on a white terrazzo surface.

Soft-Baked Mini Chocolate Chip Cookies with Almond Flour

Browse All
15 No bake desserts

Download my FREE No Bake Dessert Ebook!

As seen on:

Food Network
Shape
Men's Health
NBC
Kitchn
Glamour
  • Reader Faves: Gluten-Free Desserts
    • Gluten free macarons
    • Banana mug cake
    • Almond butter bars
    • Peanut butter Cheerio bars
    • Chia seed cookies
    • More gluten-free desserts
  • Top Chocolate Desserts
    • Chocolate quinoa crisps
    • Microwave baked oats
    • Hot chocolate bombs
    • Chocolate banana bread
    • Peanut butter brownies
    • All chocolate recipes
  • DIY & How To
    • Dried orange garland
    • How to melt chocolate chips
    • DIY face oil
    • Oven-baked eggs in a muffin tin
    • How to make taco seasoning
    • How to make oat milk in 5 minutes
  • Explore Resources
    • FAQ
    • My Baking Mixes
    • Cookbook
    • Shop Favorites
    • Web Stories
    • Meet Lindsay
Follow

@thetoastedpinenut

Accessibility

Privacy Policy

Disclaimer

Contact

© 2025 The Toasted Pine Nut
|
Site Credits Designed by Melissa Rose Design Developed by Once Coupled Support by Foodie Digital
Back to Top
307 shares